Setting Up a New Mac for Data Science
Nik 
I recently bought a new MacBook Air1 and I was ecstatic to set it up from scratch. My previous computer (or current since I still use it) was last setup back in 2018 and I kept installing/updating software to it that I forgot all the cool things. In fact, in the last 4 years, macOS had switch from Bash to ZSH as its default shell and I can’t even remember using Bash anymore.
In this post, I wanted to share with you how I went about setting up my new MacBook Air2.
So here’s the kicker. My new MacBook Air runs on the M2 processor (aka Apple Silicon), which is based on the ARM architecture. I found this website that summarizes the difference between the x86/amd64 architecture versus ARM.
To put it succinctly, ARM requires different software builds than the previous Intel Macs. In many cases, developers have released “Universal” builds of their software that can work on both Intel Macs and Apple Silicon Macs. Some software, however, has not been updated and you’ll be prompted to install Rosetta2:
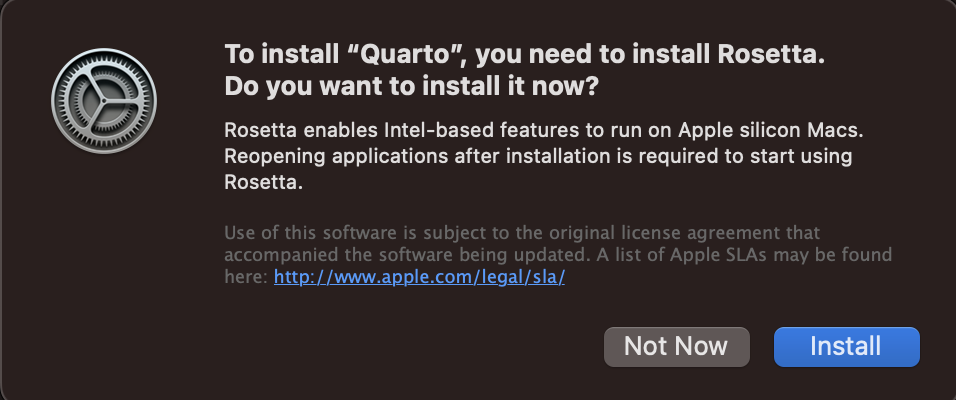
The really cool thing about Rosetta 2 is its ability to run x86/amd64 software on Apple Silicon and the performance is very good. However, I don’t want to run any software that’s not optimized for Apple Silicon, so I have only installed software that is optimized for Apple Silicon.
As you can tell from the image above, I haven’t installed Quarto. Quarto is - in my view - the better replacement for RMarkdown since it works with Python and Julia in addition to R. I’m betting that the Quarto dev team is working on an ARM optimized version (hopefully it’ll be in version 1.3).
Steps:
- Making the terminal work for me
- Brew
- iTerm2
- Git
- ZSH
- OhMyZSH
- PowerLevel10k
- Python
- Mambaforge
- The Usual Apps
- RStudio
- VSCode
- Docker
Making the Terminal Work For Me
I use the Terminal quite a bit. It’s the easiest and most efficient way to work with git. The stock Terminal app on the Mac is good, like really good. And it does the job. BUT, it can be better.
Package Manager - Brew
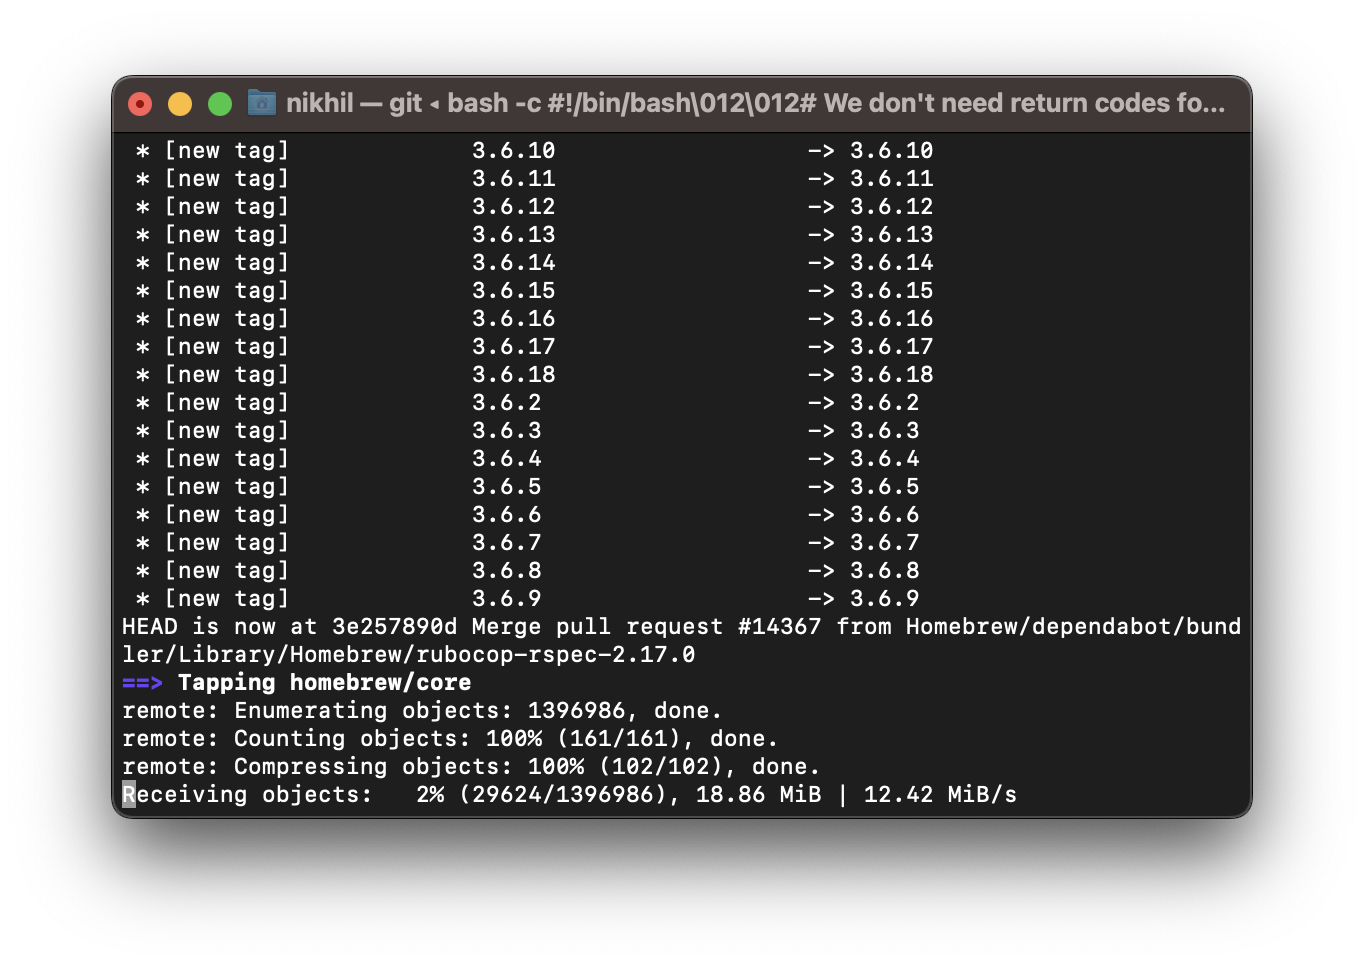
First off, I highly recommend the use of Brew. Brew is a package manager and is one of the easiest ways to install free and open-source (FOSS) software. And they’re super easy to uninstall!
To install Brew, simple copy, paste, and execute the following command the stock Terminal app:
/bin/bash -c "$(curl -fsSL https://raw.githubusercontent.com/Homebrew/install/HEAD/install.sh)"Within moments, Brew will begin the installation:
After a few moments, Brew will have completed and will let you know that you should run 3 extra lines (by copying and pasting them at the Terminal prompt):
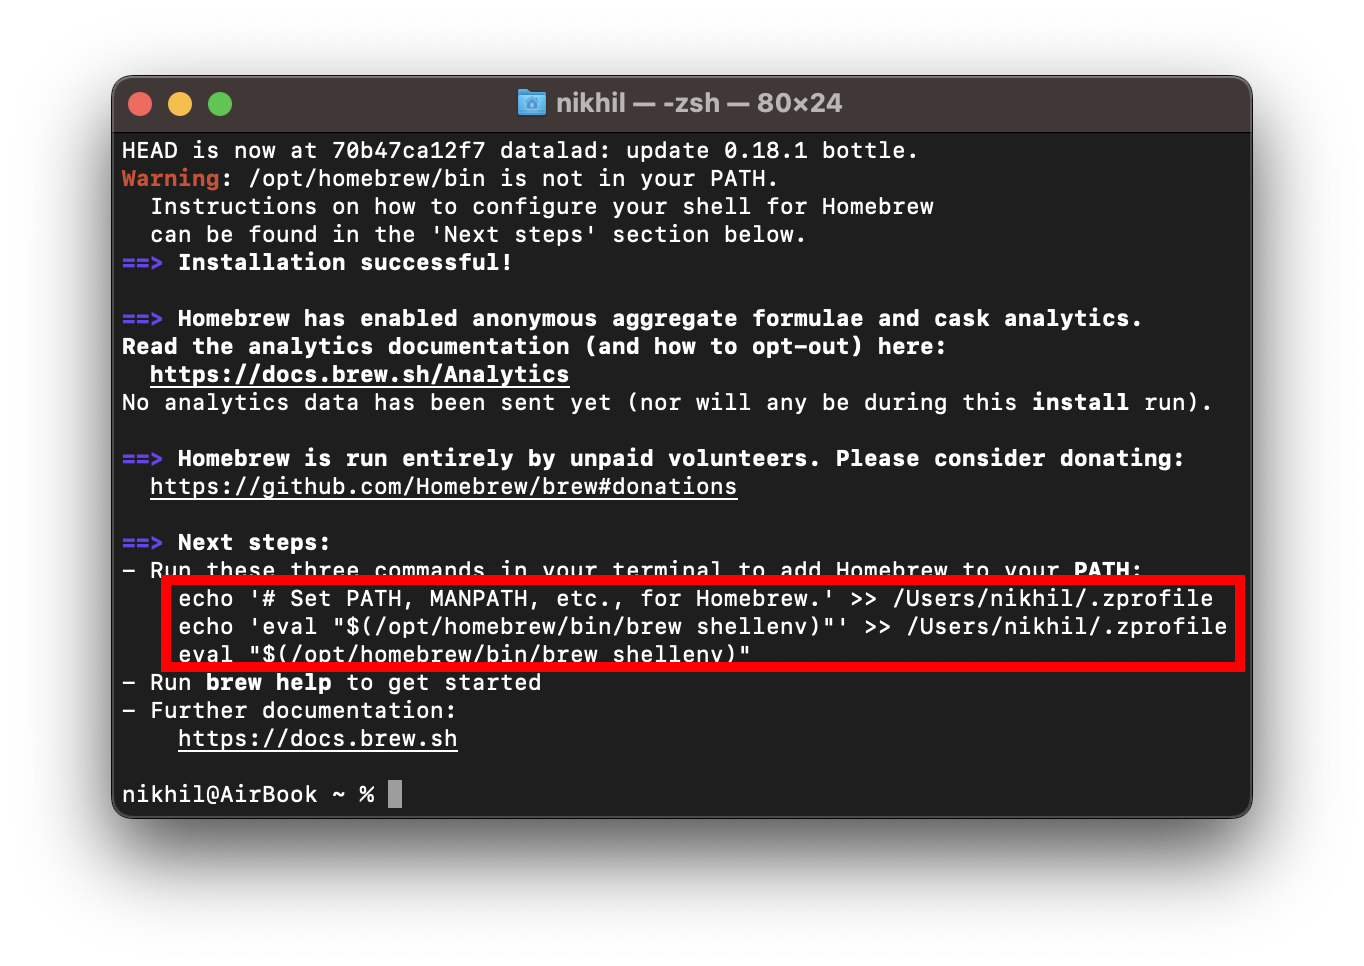
Line 1:
echo '# Set PATH, MANPATH, etc., for Homebrew.' >> /Users/nikhil/.zprofileLine 2:
echo 'eval "$(/opt/homebrew/bin/brew shellenv)" ' > /Users /nikhil/.zprofileLine 3:
eval "$(/opt/homebrew/bin/brew shellenv)"A better terminal - iTerm2
Remember how I said there’s a better Terminal? It’s called iTerm2. A totally optional software, but I think it offers far more flexibility than the stock Terminal app.
Let’s install it with Brew. Open up the stock Terminal app and run the following command:
brew install --cask iterm2
From now on, we’ll assume that the default Terminal app is iTerm2.
Update git & ZSH
Let’s kick things off and try to check the version of git that comes with macOS.
Type the following into iTerm:
git --versionA prompt like this may show up:

So apparently git is not installed. Clicking on INSTALL and then going through the various prompts, you should have git installed. However, the git version that gets installed may not be the latest; Apple typically updates git with every macOS update.
So we’re going to supplant the ‘default’ git with git from Brew!
brew install gitA few years ago, macOS transitioned away from Bash to ZSH. ZSH is more modern and also fun to work with - just like Bash (but better, I guess).
Just like git, we should update ZSH using Brew and have the latest/greatest version.
brew install zshAnd now we have a much better Terminal app (iTerm2) and with awesome git & ZSH versions.
Making ZSH even more powerful - OhMyZSH
OhMyZSH) is a framework that can really make the Terminal app (and iTerm2) extremely powerful and flexible. For instance, you can theme the heck out of the Terminal app and make it look very snazzy
Installing OhMyZSH is super simple. Open up iTerm2 and run the following command:
sh -c "$(curl -fsSL https://raw.githubusercontent.com/ohmyzsh/ohmyzsh/master/tools/install.sh)"
Let’s make OhMyZSH snazzy by adding a feature that allows for syntax highlighting:
brew install zsh-syntax-highlightingSyntax highlighting can be especially when working with git or other commands in the Terminal (i.e., iTerm):

And let’s make ZSH pretty
** I recommend this step only if you’re using iTerm**
OhMyZSH also enables themes so the Terminal (iTerm) can look stunning. My favorite theme is Powerlevel10k.
Theme installation can be a bit tricky, but straight-forward.
- Go to your home directory (using iTerm, not Finder)
cd ~/- Clone the repo
git clone --depth=1 https://github.com/romkatv/powerlevel10k.git ~/powerlevel10k- Add the theme to your ZSH configuration file (.zshrc)
echo 'source ~/powerlevel10k/powerlevel10k.zsh-theme' >>~/.zshrcCompletely exit out of iTerm (⌘+q)
Relaunch iTerm and the configuration for Powerlevel10k should initiate

If it does not show up, you can type the following:
p10k configurePowerlevel10k has quite a few setup steps that it will walk you through. On one of the steps, it will ask you if you want to use Unicode or ASCII. Choose Unicode so that the iconography in iTerm will render correctly.
And that should have our beautiful Terminal setup for success!
Now we need Python
By default, Python is available in macOS. However, I highly recommend installing a framework that enables a way to manage environments, packages, and even versions of Python.
One of the most popular frameworks that is used is Anaconda. I don’t use it.
Anaconda is great, but in my opinion it’s bloatware. It comes with an enormous amount of software that it can easily eat up 10 GB or more. One alternative is miniconda and it is very good since it is quite lean and only has the bare minimum. I don’t use that one either. Think of it as personal preference.
I recently discovered mamba and by extension mambaforge. Mamba is fast and works quite well.
Installing mambaforge is easy. Download the script and open up iTerm. Navigate to the folder where the shell script was downloaded and execute the following (assuming the shell script was downloaded to the Downloads folder):
sh ~/Downloads/Mambaforge-MacOSX-arm64.shAnd now Python with Mambaforge is installed!
The Usual Apps
I use three main applications for my data science work (both professionally and personal use):
All three of these apps I download from their respective websites and not from Brew. This is more of a personal preference.